Approvals are a core component in many Power Automate flows – I’ve personally created numerous approval workflows over time.
While using Nintex Workflows for Office 365, you could easily configure fallback actions when approvals are missed, such as when the responsible person is on vacation or simply overlooks the notification.
However, handling these scenarios in Power Automate requires a different approach.
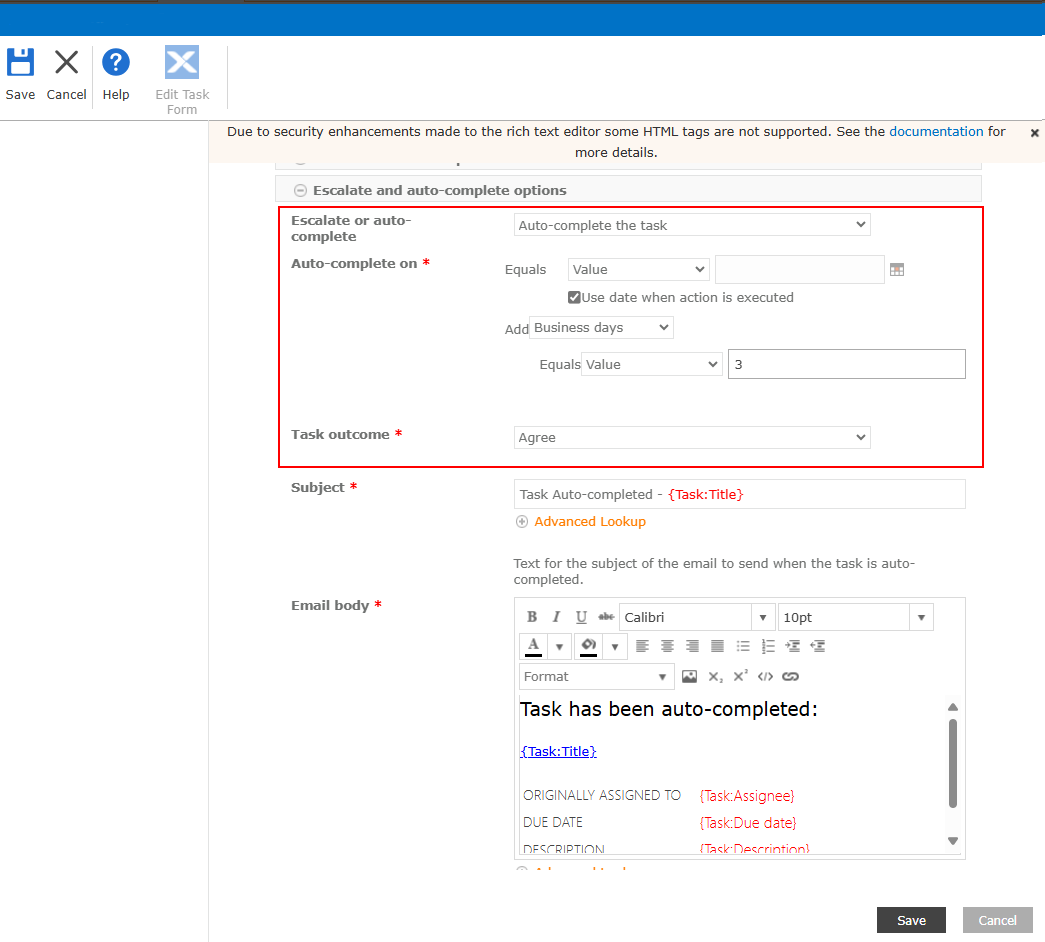
The screenshot provided shows how you would configure an approval action in Nintex Workflow for Office 365 that would automatically resolve to Agree (approval) after three days without the input of the responsible user.
Power Automate is capable of providing the same functionality but not as easy as Nintex. In this post I am going to show you how you can configure the same auto-completing behaviour in Power Automate.
Hint: This is not only useful for letting your flow work on but also in regards to the 30 days limit that would end the flow no matter what.
Setting up an approval
First, we’ll need to add a Start and wait for an approval action. Complete all the necessary fields in the Parameters tab to configure it according to your specific requirements.
The next step is defining the timeout-duration – meaning the time the approval should wait until it continues the flow execution.
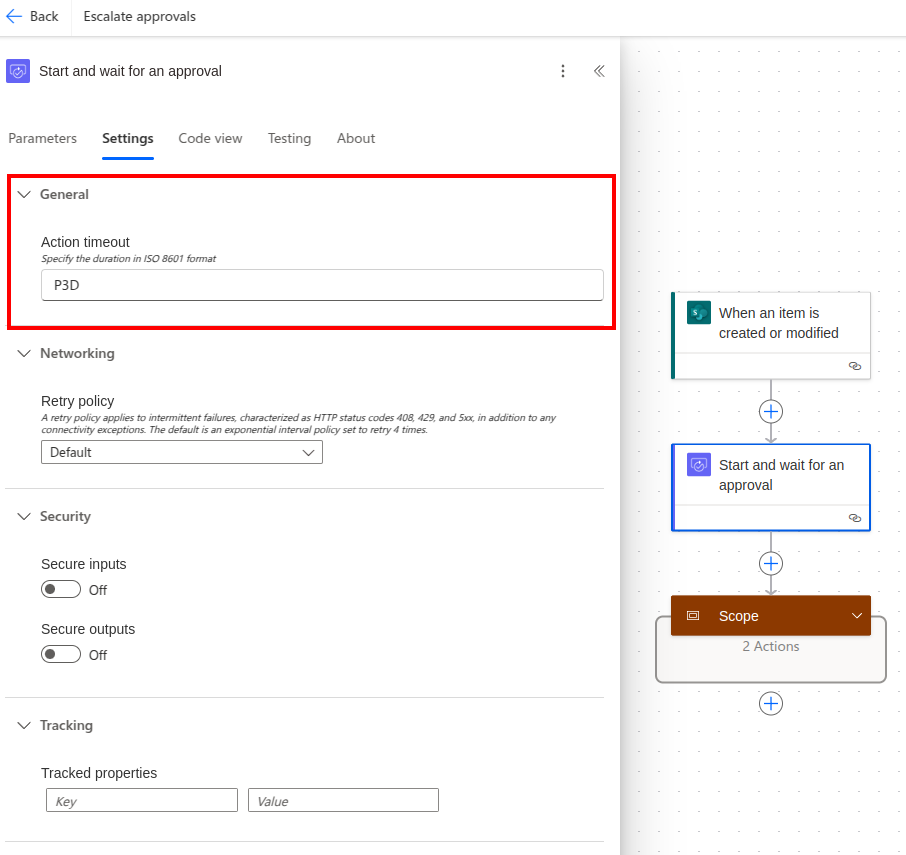
To do so open the Settings-tab in the action editor. The neccessary configuration is Action timeout (as you might have guessed by the name).
To let the action wait for three days before it gets automatically concluded, we are setting the value to P3D meaning, wait a Period of three days.
Next, define the timeout duration – the time the approval should wait before continuing the flow execution.
Open the Settings tab in the action editor.
Look for the Action timeout configuration (which is aptly named). This value uses ISO 8601 duration notation.
To set the action to wait three days before automatically concluding, enter P3D, which means ‘Period of three days’
Handling the auto-completion
Now that the approval action is set up, it’s time to handle its outcomes.
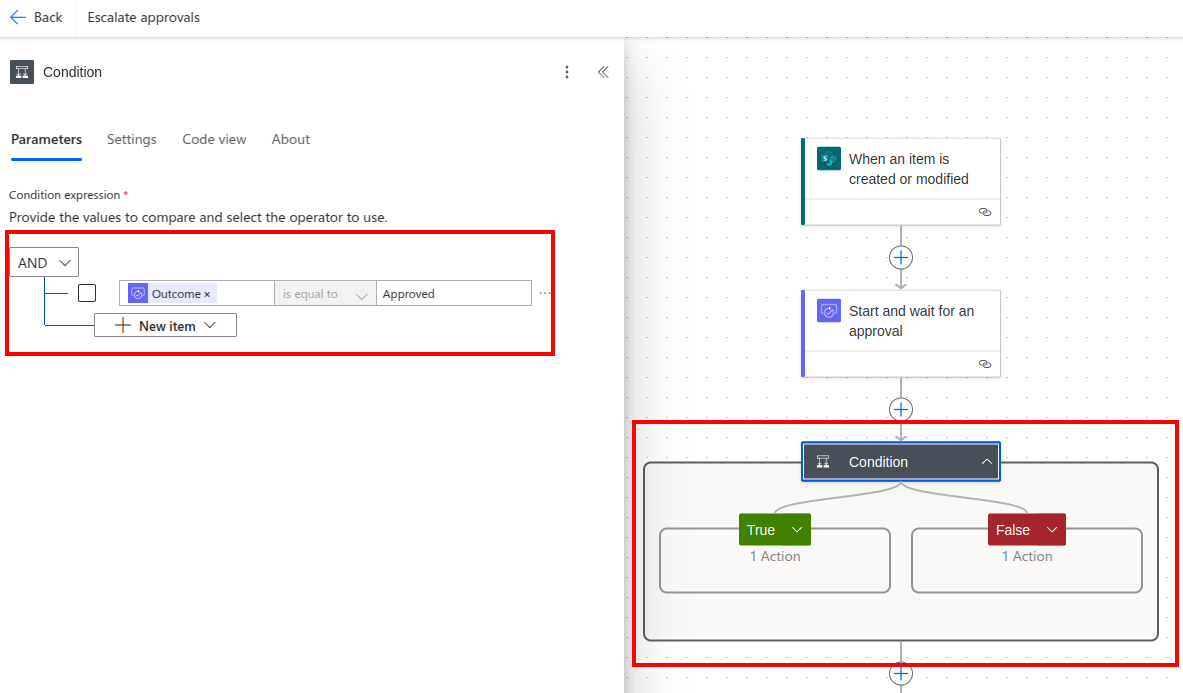
First, add a condition to respond to the user-triggered completion of the approval action.
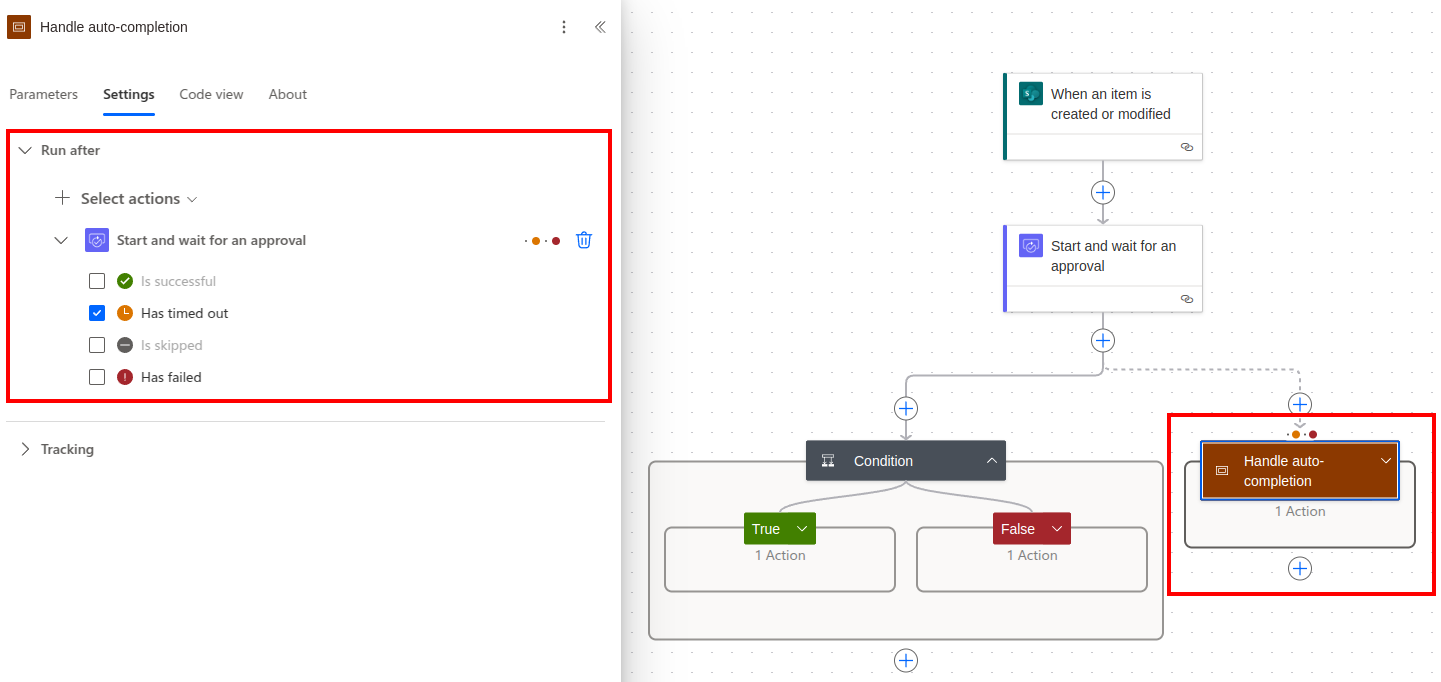
Now that we have the expected execution covered, its time to handle the unexpected (the auto-completion). Add a scope and call it something like Handle auto-completion. Open the scope editor, navigate to Settings -> Run after.
By default the previous action will be shown with a selected state of Is successful. Now add the Start and wati for an approval action and set the selected state to Has timed out-
Every time the approval action times out, the scope will be triggered.
Now that we have the expected execution covered, it’s time to handle the unexpected scenario – auto-completion.
Add a Scope and name it something like ‘Handle auto-completion’.
Open the scope editor and navigate to Settings → Run after. By default, the previous action will be shown with a selected state of ‘Is successful’.
Add the Start and wait for an approval action and change its selected state to Has timed out. This ensures the scope will be triggered whenever the approval action times out.
Wrap up
That’s it! You can now handle both the regular completion of approval tasks and the exception where an approval is neither granted nor rejected.
Typically, this exception would trigger some form of escalation – perhaps renotifying the responsible user about the pending approval, or rolling back changes made by the flow prior to the timeout.
SharePoint Online enables multilanguage support for pages within a site. When activated, you can create copies of any page in all configured languages for your site. These copies initially mirror your original page’s content in the root language. By combining Power Automate with AI capabilities, we can create an automated workflow that translates the content in these language copies.
Setup
First of all we are setting up Multilanguage Support
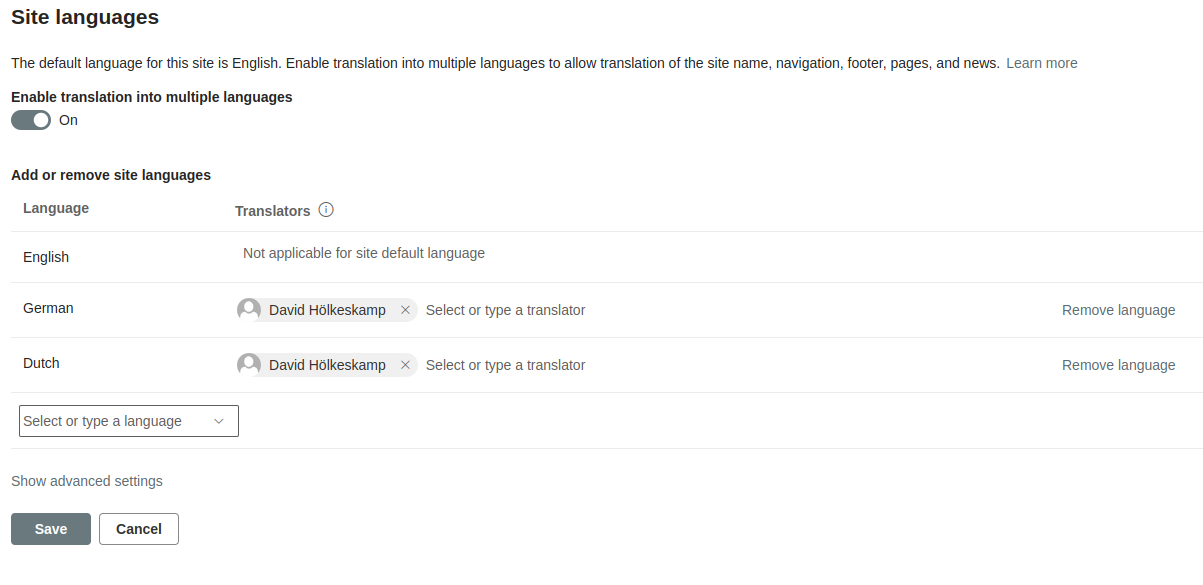
Navigate to site settings -> Language settings
Enable “Enable translation into multiple languages”
Select your required languages and assign a translator for each language. These translators should review and refine the automatic translations.
When you create a new page, you can generate translations using the translation button in the pages menu. Clicking this button will create a copy of your page in the language-appropriate folder (e.g. SitePages/de for german translations)
We are going to hook into that process and as soon as a new translation gets created, trigger a Power Automate Flow, that automatically translates the pages content.
Since auto-translation is not 100% accurate, the responsible person (which still gets the mail), should review the translation
Creating the flow
The trigger
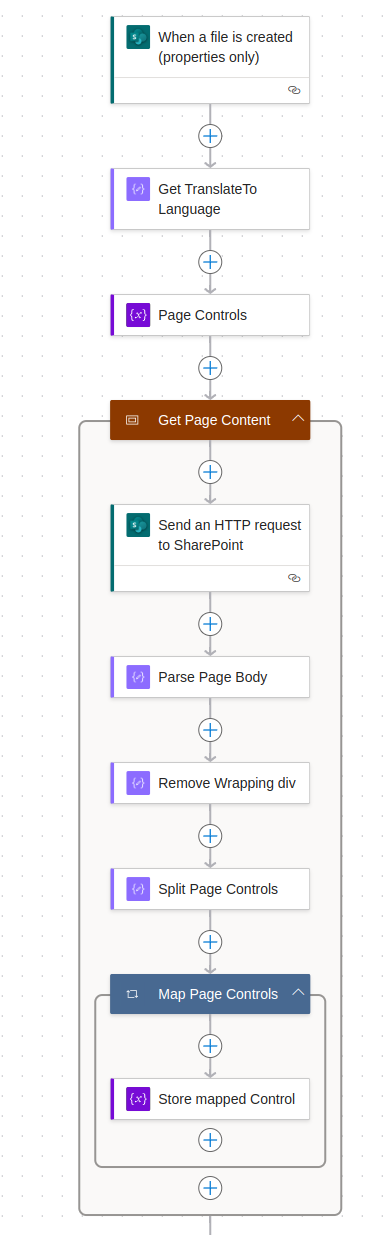
Create a new flow, name it Autotranslate Pages and select When a file is created (properties only) as trigger. Select your website and set the library as Site Pages manually as it is not selectable.
Furthermore we are adding a trigger condition, so the flow only gets triggered, when a new translation page has been created.
"Action":
When a file is created (properties only)

"Site Address":
Use the site where multilanguage support has been enabled

"Library Name":
Site Pages

"Trigger conditions":
- @equals(triggerBody()?['OData__SPIsTranslation'], true)
Getting the page content
SharePoint stores page content in a property called CanvasContent1. The SharePoint Online Page Editor structures this content using multiple controls (Canvas Controls). Each control functions like a div element, representing a block that contains webpart configuration – for example, text size settings for Text-Webparts or URLs for image webparts.
To process these controls effectively, we’ll store them in an array. This array will hold all controls and allow us to transform them in later steps of our automation.
To properly translate a page we have to extract all the controls, and to extract the controls, we have to load them first.
Add a Send an HTTP request to SharePoint and configure it as follows
"Action":
Send an HTTP request to SharePoint

"Site Address":
Same as in the trigger

"Method":
GET

"Uri (use insert expression)":
_api/web/lists/getbytitle('Site Pages')/items(@{triggerBody()?['ID']})?$select=CanvasContent1
After retrieving the page content, we have to decode it. Add the following Compose action
"Action":
Compose

"Name":
Parse Page Body

"Inputs":
decodeUriComponent(body('Send_an_HTTP_request_to_SharePoint')['d/CanvasContent1'])
After decoding the content, we are going to strip the surrounding div, as this holds no information neccessary for our flow. Add another Compose action, configured as follows
"Action":
Compose

"Name":
Remove Wrapping div

"Inputs":
slice(outputs('Parse_Page_Body'),5,sub(length(outputs('Parse_Page_Body')),6))
The next step is one more Compose action. This one splits all controls in the page content up into a nice array – makes further processing a lot easier.
You can combine those three Compose into just one by combining the formulas. Since PowerFX formulas are hard to read especially inside the Power Automate Editor I highly suggest keeping them separated
Due to the nature of how the split function works, all our controls are now missing the part we splitted on (<div data-sp-canvascontrol=).
So we need to add a Apply to each-Action, readd the splat-Part and store the control in our previously created array variable.
"Action":
Apply to each

"Select an output form previous step":
outputs('Split_Page_Controls')
So far we are reacting to new translation pages being created, getting the info of what language we are targeting and how the page has been set up. Your flow should look like this.
Translating
Let’s dive into the core functionality of our Power Automate flow – the translation process. While it sounds straightforward (extract text, translate it, update the page), we need several precise steps to make it work correctly.
Here’s what we’ll accomplish:
Extract text content from page controls
Process this content for translation
Update the page with translated content
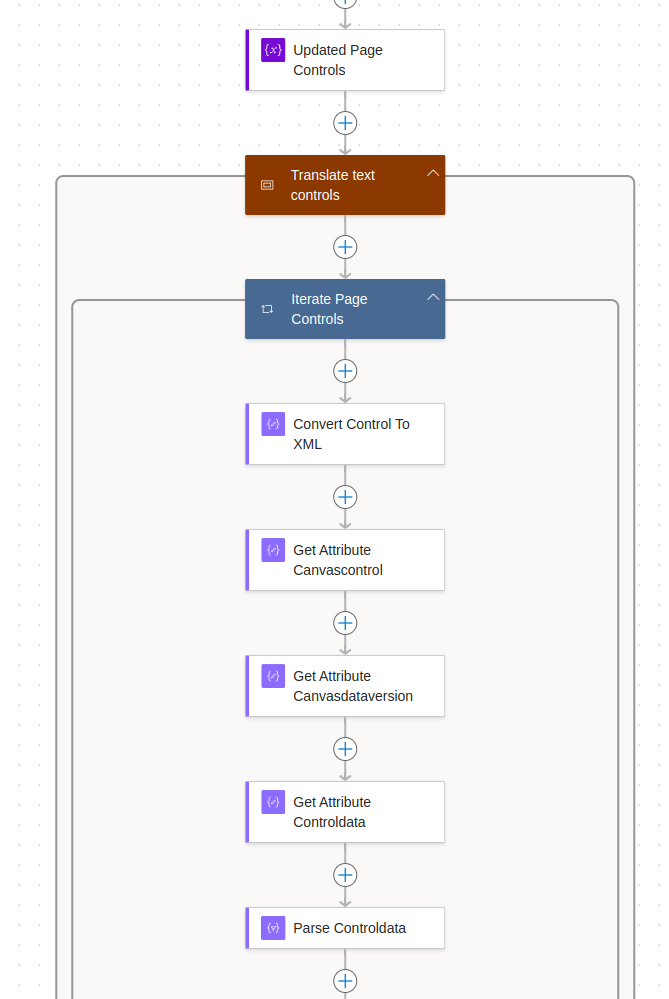
Let’s start by creating a new variable called “Update Page Controls” – this will be crucial for our next steps.
The array variable will store our processed controls before we add them back to the updated page. To handle each control individually, we’ll use an Apply to each action in Power Automate. This action lets us iterate through all controls and process them one by one.
"Action":
Apply to each

"Name":
Iterate Page Controls

"Select an output form previous step":
variables('Page Controls')
To process the controls, we need to transform their data format. Each control is stored as an HTML string, but Power Automate needs a different format to work with them. We’ll follow these steps:
Convert the HTML string to XML
Extract the essential attribute values
Transform the control’s configuration string into JSON format
Convert the HTML to XML
"Action":
Compose

"Name":
Convert Control To XML

"Inputs":
xml(items('Iterate_Page_Controls'))
Extract value from attribute data-sp-canvascontrol
"Action":
Compose

"Name":
Get Attribute Canvascontrol

"Inputs":
xpath(outputs('Convert_Control_To_XML'), 'string(/*/@data-sp-canvascontrol)')
Extract value from attribute data-sp-canvasdataversion
"Action":
Compose

"Name":
Get Attribute Canvasdataversion

"Inputs":
xpath(outputs('Convert_Control_To_XML'), 'string(/*/@data-sp-canvasdataversion)')
Extract value from attribute data-sp-controldata
"Action":
Compose

"Name":
Get Attribute Controldata

"Inputs":
xpath(outputs('Convert_Control_To_XML'), 'string(/*/@data-sp-controldata)')
The data-sp-controldata attribute contains JSON that defines the control’s (webpart’s) position and type on the page. To work with this information in Power Automate, we need to parse this JSON.
The schema is stripped down, as we only ever need the controlType-property
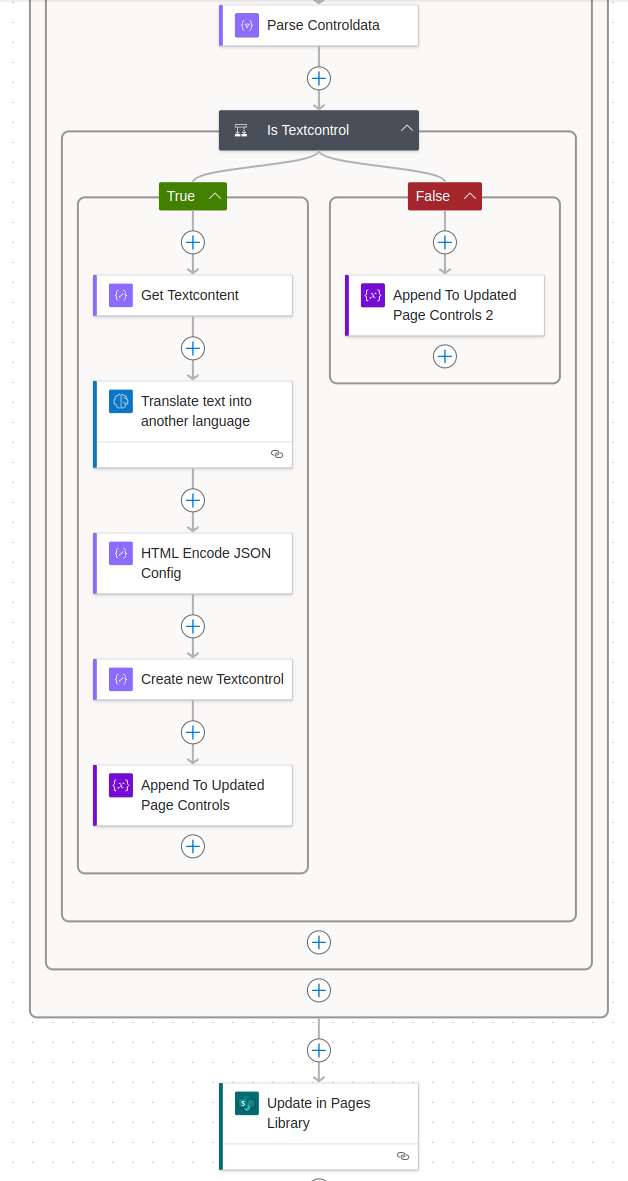
We need to identify which controls require translation and which can remain unchanged. The controlType property helps us make this decision. When controlType equals 4, we’re dealing with a text control that needs translation. We’ll add a condition to our loop:
If controlType is NOT 4: Add the control directly to our Updated Page Controls array
If controlType is 4: The control will need translation (which we’ll handle next)
"Action":
Condition

"Name":
Is Textcontrol

"Condition expression":
body('Parse Controldata')?['controlType'] is equal to 4
Add following action to the false branch of the condition
The workflow preserves all non-text controls in their original order on the page. Next, we focus on translating the text controls and inserting them back into the Updated Page Controls array. To begin the translation process, add an action within the true branch of the condition to extract the content from the text control.
"Action":
Compose

"Name":
Get Textcontent

"Inputs":
xpath(outputs('Convert_Control_To_XML'), 'string(/)')
Now we are finally at the point, where AI comes into play. Translating the text is done by a model provided by Microsoft. Add the following action to the flow
"Action":
Translate text into another language

"Name":
Translate text into another language

"Translate from":
Detect automatically

"Text":
outputs('Get Textcontent')

"Translate to":
substring(triggerBody()?['OData__SPTranslationLanguage/Value'], 0, 2)
With the translated content at our hands, we need to recreate the text control, add it to Updated Page Controls and finally update the page.
The first step in recreating the text control is HTML-Encoding the JSON configuration. By reading the configuration, Power Automate automatically decodes the JSON but when recreating the control, the JSON config will NOT be automatically encoded, which will lated on create issues with the page.
"Action":
Append to array variable

"Name (Property)":
Updated Page Controls

"Condition expression":
outputs('Create new Textcontrol')
At this point, our loop through the controls is complete. We’ve preserved all non-text controls and updated the text controls with their translations. The final step is to update the page in the SharePoint pages library using an HTTP request action.
"Action":
Send an HTTP request to SharePoint

"Site Address":
Same as in the trigger

"Method":
POST

"Uri (use insert expression)":
_api/web/lists/getbytitle('Site Pages')/items(@{triggerBody()?['ID']})

"Headers":
- Content-Type: application/json
- IF-MATCH: *
- X-HTTP-METHOD: MERGE

"Body":
{'CanvasContent1':'<FORMULA-HERE>'}

Add the following formula in place of <FORMULA-HERE>:
replace(concat('<div>',join(variables('Updated Page Controls'),''),'</div>'), '''', '\''')
The replace function escapes single quotes (') in the new text control, as unescaped ones will lead to errors while running the update.
Thats it – the flow should look like this now.
All that is left to do is testing. Create new pages, add some text (and some other web parts) and create some translation pages. The new pages should contain the translated text as well as all other web parts from the root-page.
Sentiment analysis is a powerful technique that helps businesses understand the emotional undertones of customer feedback. By automatically classifying text as positive, negative, or neutral, companies can gain insights beyond simple written words. In this guide, we’ll explore how to build a sentiment analysis workflow using Power Automate that processes customer reviews submitted via email.
Traditional survey methods (like Microsoft Forms) often constrain customer expression, whereas an open email approach offers more flexibility. By allowing customers to share their experiences in their own words, we can capture more nuanced and authentic feedback. This method not only reduces barriers to providing input but also increases the likelihood of meaningful customer participation.
The setup
Setting up an effective sentiment analysis system requires careful infrastructure planning. We’ll create three essential components to streamline our customer feedback process: a shared inbox to receive reviews, a SharePoint teamsite for centralized oversight, and a SharePoint list that holds the customer reviews and their analysed scores.
The teamsite
The first step in our sentiment analysis project involves creating a SharePoint team site, which offers integration with Microsoft Teams. Here’s how to set up your collaborative workspace:
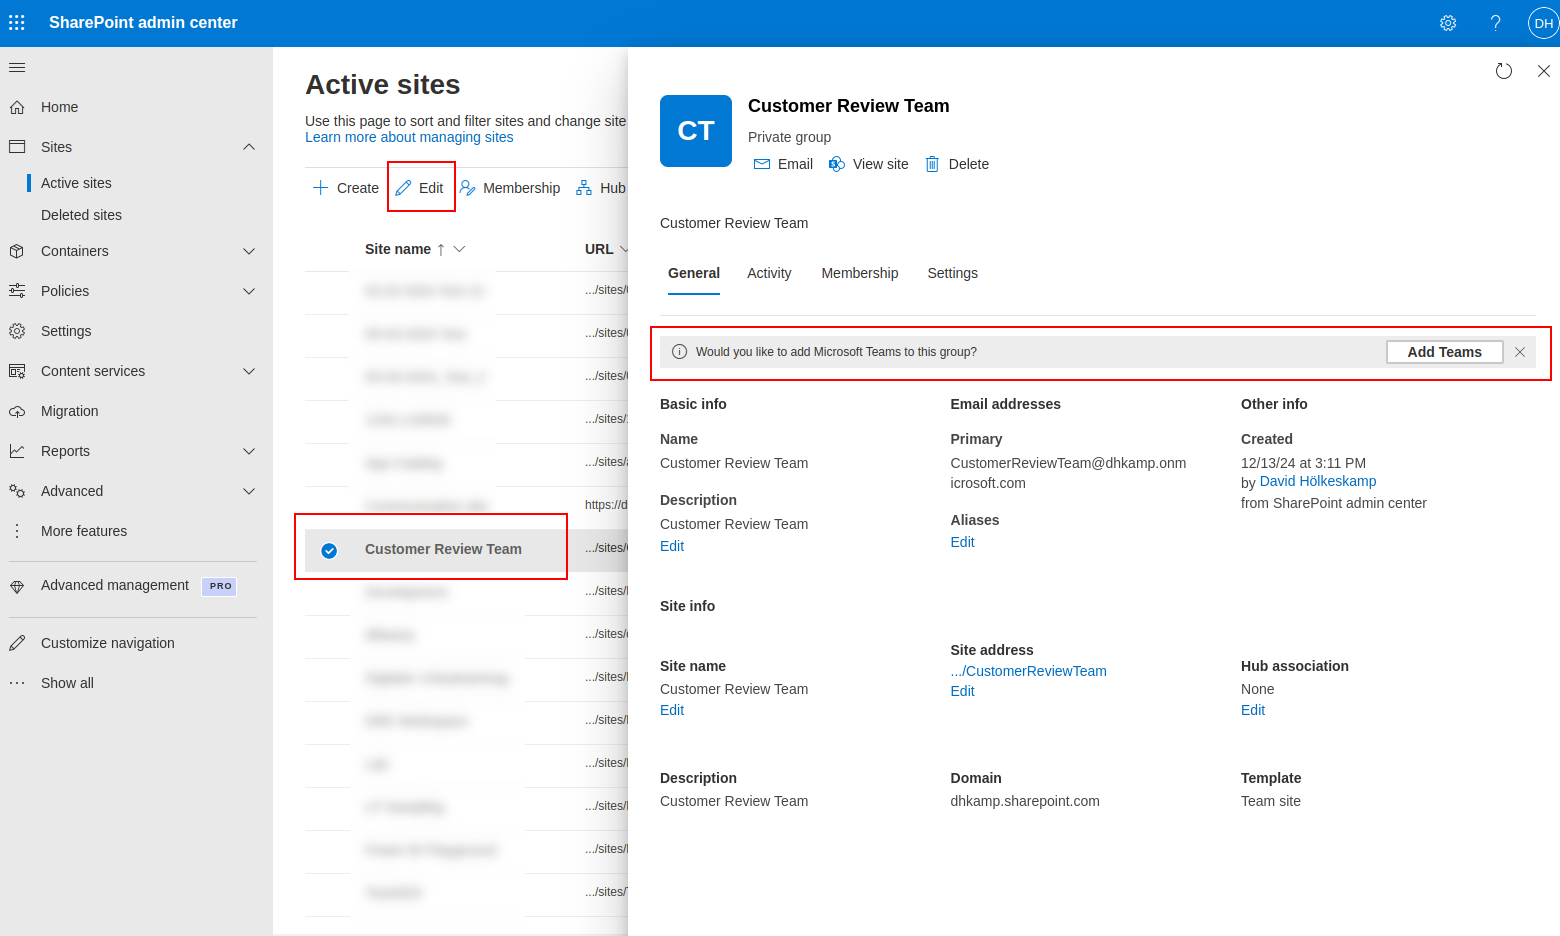
Navigate to the site management in the (https://<tenantname>-admin.sharepoint.com/_layouts/15/online/AdminHome.aspx#/siteManagement/) and create a new teamsite. You are free to chose the name and the template type, for this guide I am going to use the Microsoft Standard Teamsite template and set the name to Customer Review Team
After our teamsite has been created, open its settings and click on the Add Teams-Button in the banner that says Would you like to add Microsoft Teams to this group?
The list
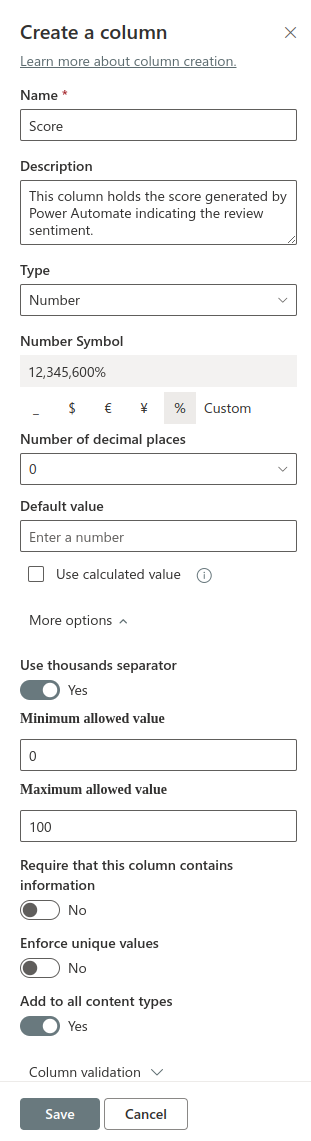
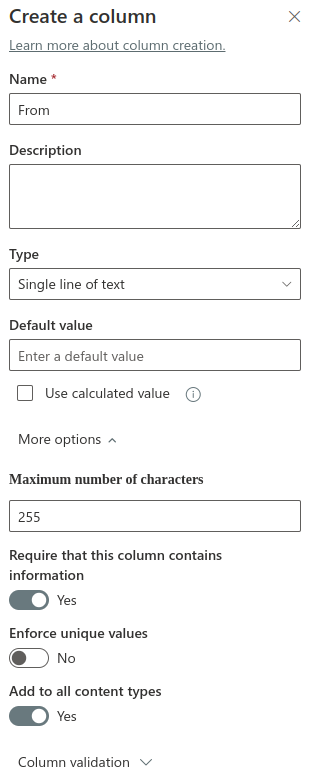
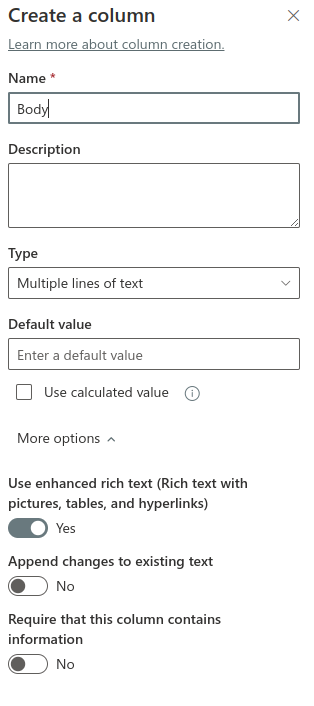
To store our review data and scores, we are going to need a list. Open the previously created teamsite and create a new list (Site contents → New → List). Use the blank list template and name it Customer Reviews.
The list gets created containing only the Title column. We are going to add the more columns, to hold the From-Address, the Review-Text (Body) and the score. The following screenshots will show you how to configure the columns
The shared mailbox
The last setup step we have to take is creating a shared mailbox where our customers can send the reviews to. Open the Microsoft 365 Admin Center (https://admin.microsoft.com/#/SharedMailbox) and create a new shared mailbox.
Click the Add a shared mailbox button and fill the required fileds. I have named my mailbox Cusomter Review Mailbox and set the adress to feedback@tenantname.onmicrosoft.com.
Now you need to add members to the mailbox. Currently, the only member necessary is the user in whose context the flow will run. Creating the mailbox completes the setup step. We are now ready to tackle the automation.
The automation
Now it is time to create the flow that runs a sentiment analysis on a customer submitted review.
Give it any name, I have named mine Customer Review Sentiment Analysis.
As trigger select When a new email arrives in a shared mailbox (V2)
After the flow creation has been completed, configure the trigger and set our shared mailbox address as Original Mailbox Address. Further trigger configuration is not required.
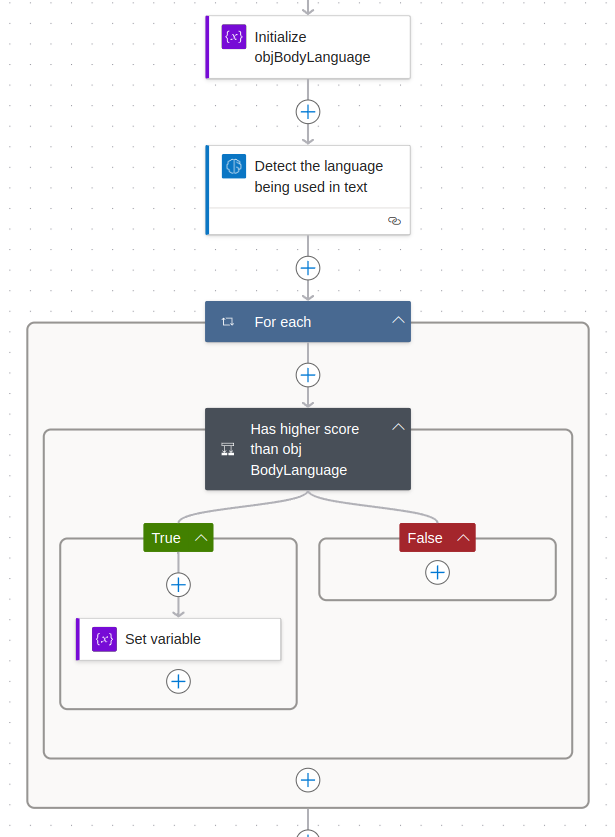
Detect the language
The first part of analysing customer reviews is finding out in what language they where submitted. To do just that, create a new variable, call it obj_BodyLanguage, give it the type Object and set the value to the following JSON.
{
  "score": 0,
  "language": "en"
}
Add the Detect the language being used in text action to your flow and pass the Body of your trigger action as text. The result of Detect the language being used in text is an array of languages each with a confidence score indicating how “sure” the AI is about this language. We are going to iterate through all the results and if a results confidence score is higher than the score of our current obj_BodyLanguage, overwrite obj_BodyLanguage with the result. In the end we will have the language with the highest confidence score set for further usage
Analyse the sentiment
Now that we know what language the text was written in, its time to run a sentiment analysis. Add the Analyze positive or negative sentiment in text-action to the flow, set the language parameter to variables('obj_BodyLanguage')['language'] and the text parameter to the triggers Body.
The Analyze positive or negative sentiment in text action has multiple outcomes, and we are working with Probability overall text is negative, Probability overall text is positive and Probability overall text is neutral. Scores are returned as two-digit decimals between 0 and 1 and all scores (negative, postive and neutral) summed up equal 1. We are calculating the overal sentiment score using the following formular
Positive Score + (Neutral Score / 2)
We are dividing the neutral score by 2 to add its weight to both positive and negative. This calculation results in a decimal number between 0 and 1 – representing the sentiment percentage.
Add a Compose action that runs the following formula to calculate the overal score.
With our sentiment analysis complete, let’s store the results in SharePoint for future analysis and reporting. We’ll add a Create item action to our flow that saves each review with its calculated sentiment score.
Configure the action as follows:
Select your Customer Reviews site as the target SharePoint site Choose the Customer Reviews List we created earlier Map the following email data to their respective columns:
Title: Mail subject line From: Sender’s email address Body: Full review text Score: Calculated sentiment score from our previous step
Remember to save your workflow and test it by sending a few sample reviews to ensure everything works as expected.
Wrapping up
The complete workflow should look like the following screenshot
Thats it. Every mail received will be processed and the sentiment score will be safed. There are a lot improvements that can be done to improve our application but thats no content for this guide.
You could
Add custom column formatting to the score column in the reviews list, to render the percentage a different way, maybe as stars that get filled based on the score.
Notify all team members Make the teamsite available in teams and add notifications.
Incorporate planner Bad reviews could lead to automatic planner task creation for our customer review team.